You might wonder if it's possible to connect multiple charge controllers to a single battery bank when expanding your solar system or working with multiple solar arrays. The answer is yes—and it's actually a common practice for larger solar installations that need increased capacity. This configuration allows you to maximize your solar energy collection, maintaining system flexibility and reliability at the same time.
In this guide, we'll explain why to use multiple charge controllers with one battery bank, walk you through the proper connection methods, and share important safety considerations.
Why Use Multiple Charge Controllers?
Using multiple charge controllers with a single battery bank offers several advantages for both residential and commercial solar installations. This setup becomes particularly valuable as energy needs grow or when you work with complex solar panel configurations that a single controller can't efficiently manage.
Here are the four main reasons to consider a multi-controller solar setup:
- Expanded system capacity. When your solar array exceeds the input capacity of a single charge controller, adding another controller allows you to connect more panels without upgrading to a more expensive, higher-capacity unit. This is especially beneficial when you already have a controller and want to expand your system gradually.
- Mixed panel orientations. If you have solar panels facing different directions (such as east and west-facing arrays), using separate MPPT charge controllers for each array ensures maximum power point tracking optimization for each orientation, improving overall system efficiency.
- Redundancy and reliability. Having multiple controllers means your solar system won't completely fail if one controller malfunctions. The remaining controllers will continue charging your batteries, providing crucial backup power during maintenance or repairs.
- Combining different panel types. When using solar panels with different specifications (wattage, voltage, or age), separate controllers allow each array to operate at its optimal settings without being limited by mismatched panels in a series string.
How to Connect Multiple Charge Controllers to One Battery Bank?

Connecting multiple solar charge controllers to the same battery requires careful planning and proper wiring techniques. The process involves creating a parallel solar charge controller setup where each controller independently manages the connected solar array while sharing the common battery bank.
Follow these steps to connect multiple charge controllers to a single battery bank:
Step 1: Choose Compatible Controllers (MPPT vs. PWM)
First you need to select compatible units. While it's technically possible to mix MPPT and PWM controllers, it's generally recommended to use the same type for optimal performance. MPPT controllers are more efficient and work better with higher voltage arrays. Therefore, they’re preferred for most multi-controller installations.
When buying charge controllers, ensure they're rated for your battery bank voltage (12V, 24V, or 48V) and that their combined charging current doesn't exceed your battery bank's maximum charge rate. Also, each controller should have similar charging profiles to prevent conflicts during the bulk, absorption, and float charging stages.
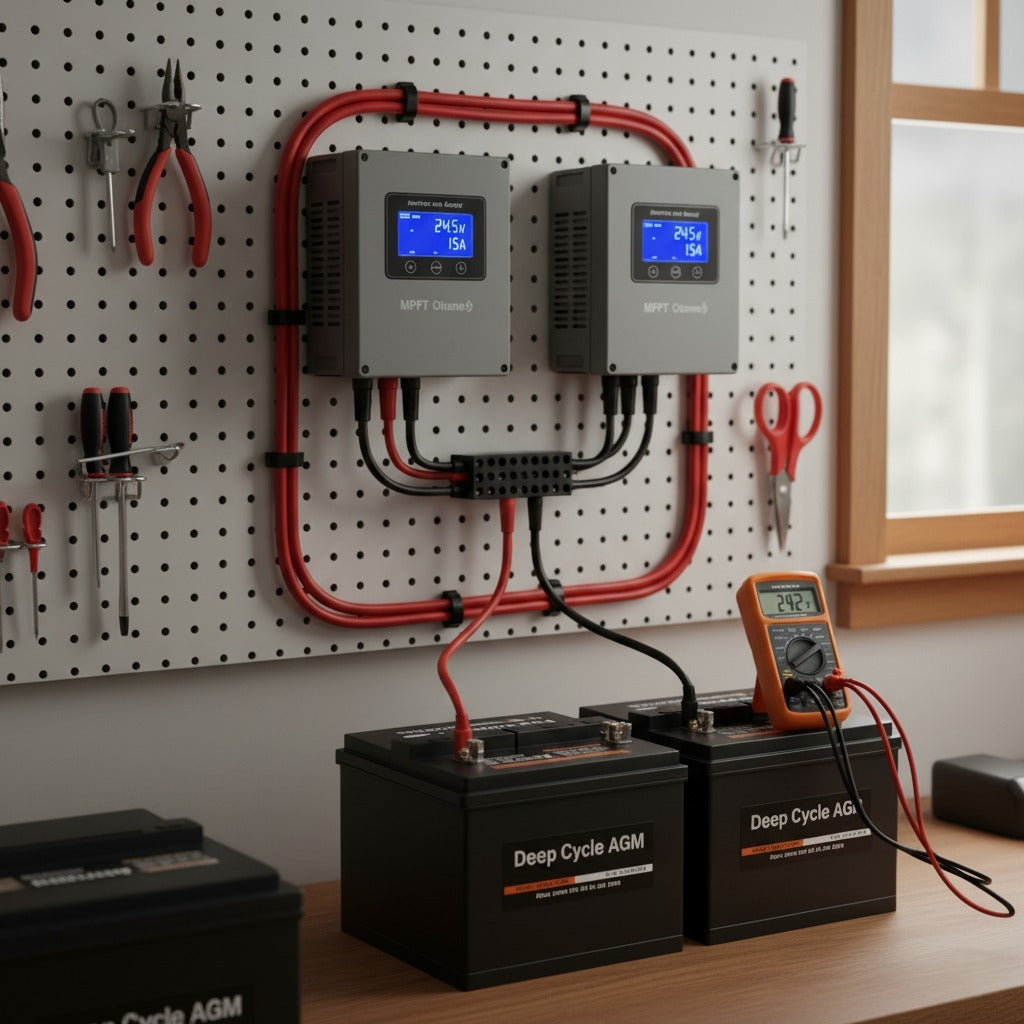
Step 2: Wire Controllers in Parallel to the Battery Bank
When connecting charge controllers to the same solar battery, each controller should have its own dedicated wiring run from the controller to the battery bank. Never daisy-chain controllers together.
Use properly sized cables based on the current rating and distance from each controller to the batteries. Connect each controller's positive output to the battery bank's positive terminal and negative to negative, ensuring all connections are tight and corrosion-free.
For larger installations with an inverter, position the battery connections so that the inverter draws power evenly from the battery bank. This parallel configuration allows each controller to monitor battery voltage independently and adjust the charging accordingly.
Step 3: Ensure Proper Fusing and Safety Disconnects
Safety is paramount when connecting multiple charge controllers to one battery bank. Install appropriate fuses or circuit breakers between each controller and the battery bank, sized according to the controller's maximum output current plus a 25% safety margin.
Include DC-rated disconnects for each controller to allow individual isolation during maintenance. For systems with a solar inverter, ensure the AC and DC sides are properly protected. Ground all controllers to a common grounding point, following local electrical codes. Also, consider installing a battery monitor to track the combined charging current from all controllers and ensure it doesn't exceed the battery manufacturer's specifications.
Step 4: Monitor Voltage and Current to Avoid Overcharging
Proper monitoring is essential for a dual charge controller system to prevent overcharging and ensure balanced operation. Most modern charge controllers include built-in voltage sensing that automatically adjusts output based on battery voltage. However, when using two MPPT charge controllers or more, it's important to verify that all controllers read similar battery voltages.
Install a battery monitor or shunt-based meter to track total charging current from all controllers. Set identical charging parameters (bulk, absorption, float voltages and transition points) on all controllers to ensure they work in harmony. Some advanced controllers offer communication capabilities that allow them to coordinate charging activities, preventing conflicts and optimizing the charging process.
Important Considerations for Multiple Charge Controllers

When implementing multiple solar arrays with one battery, there are several critical factors that can impact system performance and safety. These include:
- Temperature compensation. If your charge controllers have temperature compensation features, ensure all controllers use the same temperature sensor or are programmed with identical temperature coefficients. Mismatched temperature compensation can cause controllers to fight each other, with one trying to increase voltage while another decreases it.
- Battery cable sizing. The combined charging current from multiple controllers requires larger battery cables than single-controller systems. Calculate total maximum current and size cables accordingly, following the National Electric Code guidelines for ampacity and voltage drop.
- Charge controller placement. Position controllers in well-ventilated areas with similar ambient temperatures. Controllers in hotter locations may derate their output or enter protection mode earlier than cooler units, creating imbalanced charging. Mount controllers at least 6 inches apart to prevent heat buildup.
- Battery bank capacity. Ensure your battery bank can handle the combined charging current from all controllers. Most battery manufacturers specify maximum charge rates as a percentage of capacity (typically 10-20% for lead-acid, up to 50% for lithium with proper solar battery backup systems).
Troubleshooting Common Multi-Controller Solar System Problems
Even well-designed multi-controller systems can experience issues. Problems may arise from wiring, communication conflicts, or thermal stress, all of which can affect battery life and overall system performance. The following tips address some of the most common challenges and provide actionable solutions.
#1. Uneven Charging or Voltage Drops
One of the most frequent issues in multi-controller setups is uneven charging, where one controller handles most of the load while others remain underutilized. This often stems from voltage drops in wiring, which can occur if cables are too long, too thin, or routed in ways that increase resistance.
Here’s how to troubleshoot this issue:
- Measure voltages. Use a multimeter to check the voltage at each controller’s battery terminals and compare it to the actual battery voltage. Differences greater than 0.1 V can indicate a problem.
- Check cable sizing and length. Unequal cable lengths or undersized wires can create small voltage differences that significantly impact charge distribution. Upgrade to thicker cables or shorten runs to balance voltage.
- Verify controller settings. Ensure all controllers have identical charge parameters (float voltage, absorption voltage, charge profile). Confirm that voltage calibration is accurate.
- Monitor performance. After adjustments, observe each controller to ensure charging is distributed evenly.
#2. Controller Communication Conflicts
Some controllers offer communication features for coordinated charging. However, incompatible protocols can cause conflicts, such as rapid cycling or error codes.
Let’s see how you can troubleshoot this issue:
- Disable communication. If conflicts arise, disable communication features temporarily to allow each controller to operate independently based solely on battery voltage.
- Use compatible controllers. For coordinated operation, stick with units from the same manufacturer or verified compatible models to prevent protocol mismatches.
- Consider integrated solutions. In complex systems requiring coordinated charging, using a hybrid inverter with built-in charge controller management can simplify operations and reduce the risk of conflicts.
#3. Overheating Controllers
Excessive heat is a common cause of controller shutdowns or failure, especially in multi-controller systems handling high loads. Overheating can reduce efficiency, shorten lifespan, and trigger thermal protection mechanisms.
There are several things you can do to troubleshoot this issue, such as to:
- Check the installation environment. Ensure adequate airflow around each controller. Avoid enclosed spaces that trap heat and verify that ambient temperatures remain within the manufacturer’s specifications.
- Balance the load. Redistribute solar panels more evenly among controllers to prevent any single unit from being overworked.
- Verify cable sizing. Undersized battery cables create resistance, forcing controllers to work harder and generate excess heat. Upgrade to properly rated cables.
- Add cooling solutions. If overheating persists, consider active cooling (fans or vents) or relocating controllers to a cooler area.
- Upgrade if necessary. In extreme cases, adding higher-capacity controllers or additional units can help spread the load and reduce thermal stress.
Ready to Expand Your Solar System With Multiple Charge Controllers?
Browse our selection of MPPT and PWM charge controllers compatible with parallel operation.
Final Thoughts
Connecting multiple charge controllers to one battery bank is a practical solution when expanding your solar system capacity. By following proper installation procedures, ensuring controller compatibility, and implementing appropriate safety measures, you can create an efficient multi-controller solar setup.
Remember that while the initial setup requires careful planning, the benefits of increased capacity, redundancy, and flexibility make it worthwhile for many solar applications. With proper monitoring and maintenance, your parallel charge controller system will provide reliable service for years to come.
Multiple Charge Controllers One Battery Bank FAQ
#1. Can I use MPPT and PWM together?
While technically possible, mixing MPPT and PWM controllers isn't recommended. They use different charging algorithms that can conflict, reducing overall efficiency. For best results, use controllers of the same type and ideally the same model.
#2. Can I use two chargers on one battery?
Yes, you can use two or more solar charge controllers on one battery bank. Each controller operates independently, monitoring battery voltage and adjusting its output accordingly. Ensure combined charging current doesn't exceed battery specifications.
#3. Do all controllers need to be the same brand or model?
Controllers don't need to be identical, but using the same brand and model simplifies setup and ensures consistent charging profiles. If mixing brands, verify they have compatible charging voltages and can work with your solar system configuration.
#4. How do I monitor multiple controllers efficiently?
Install a battery monitor with a shunt to track total current from all controllers. Many modern controllers also offer remote monitoring via apps or displays. For comprehensive monitoring, consider a system that aggregates data from all controllers into a single interface.